AWS S3 Bucket
Setup instructions
Setup S3 bucket
- Create a new bucket, in the US Standard S3 region, named
rill-${ORG_NAME}-share, where "${ORG_NAME}" is your organizational name. Make sure the bucket name is a DNS-compliant address. For example, the name should not include any underscores; use hyphens instead, as shown in the example above. - Be sure to disable the "Requester Pays" feature. For more information on S3 bucket name guidelines, see the AWS documentation.
Method 1: Bucket ACL Policies
We can provide access to the desired buckets using the bucket policies. You can provide access to the root user for Rill Data AWS Account.
arn:aws:iam::248432388601:root
Using AWS Console
- Open S3 bucket console: https://s3.console.aws.amazon.com/
- Choose the S3 bucket to be shared.
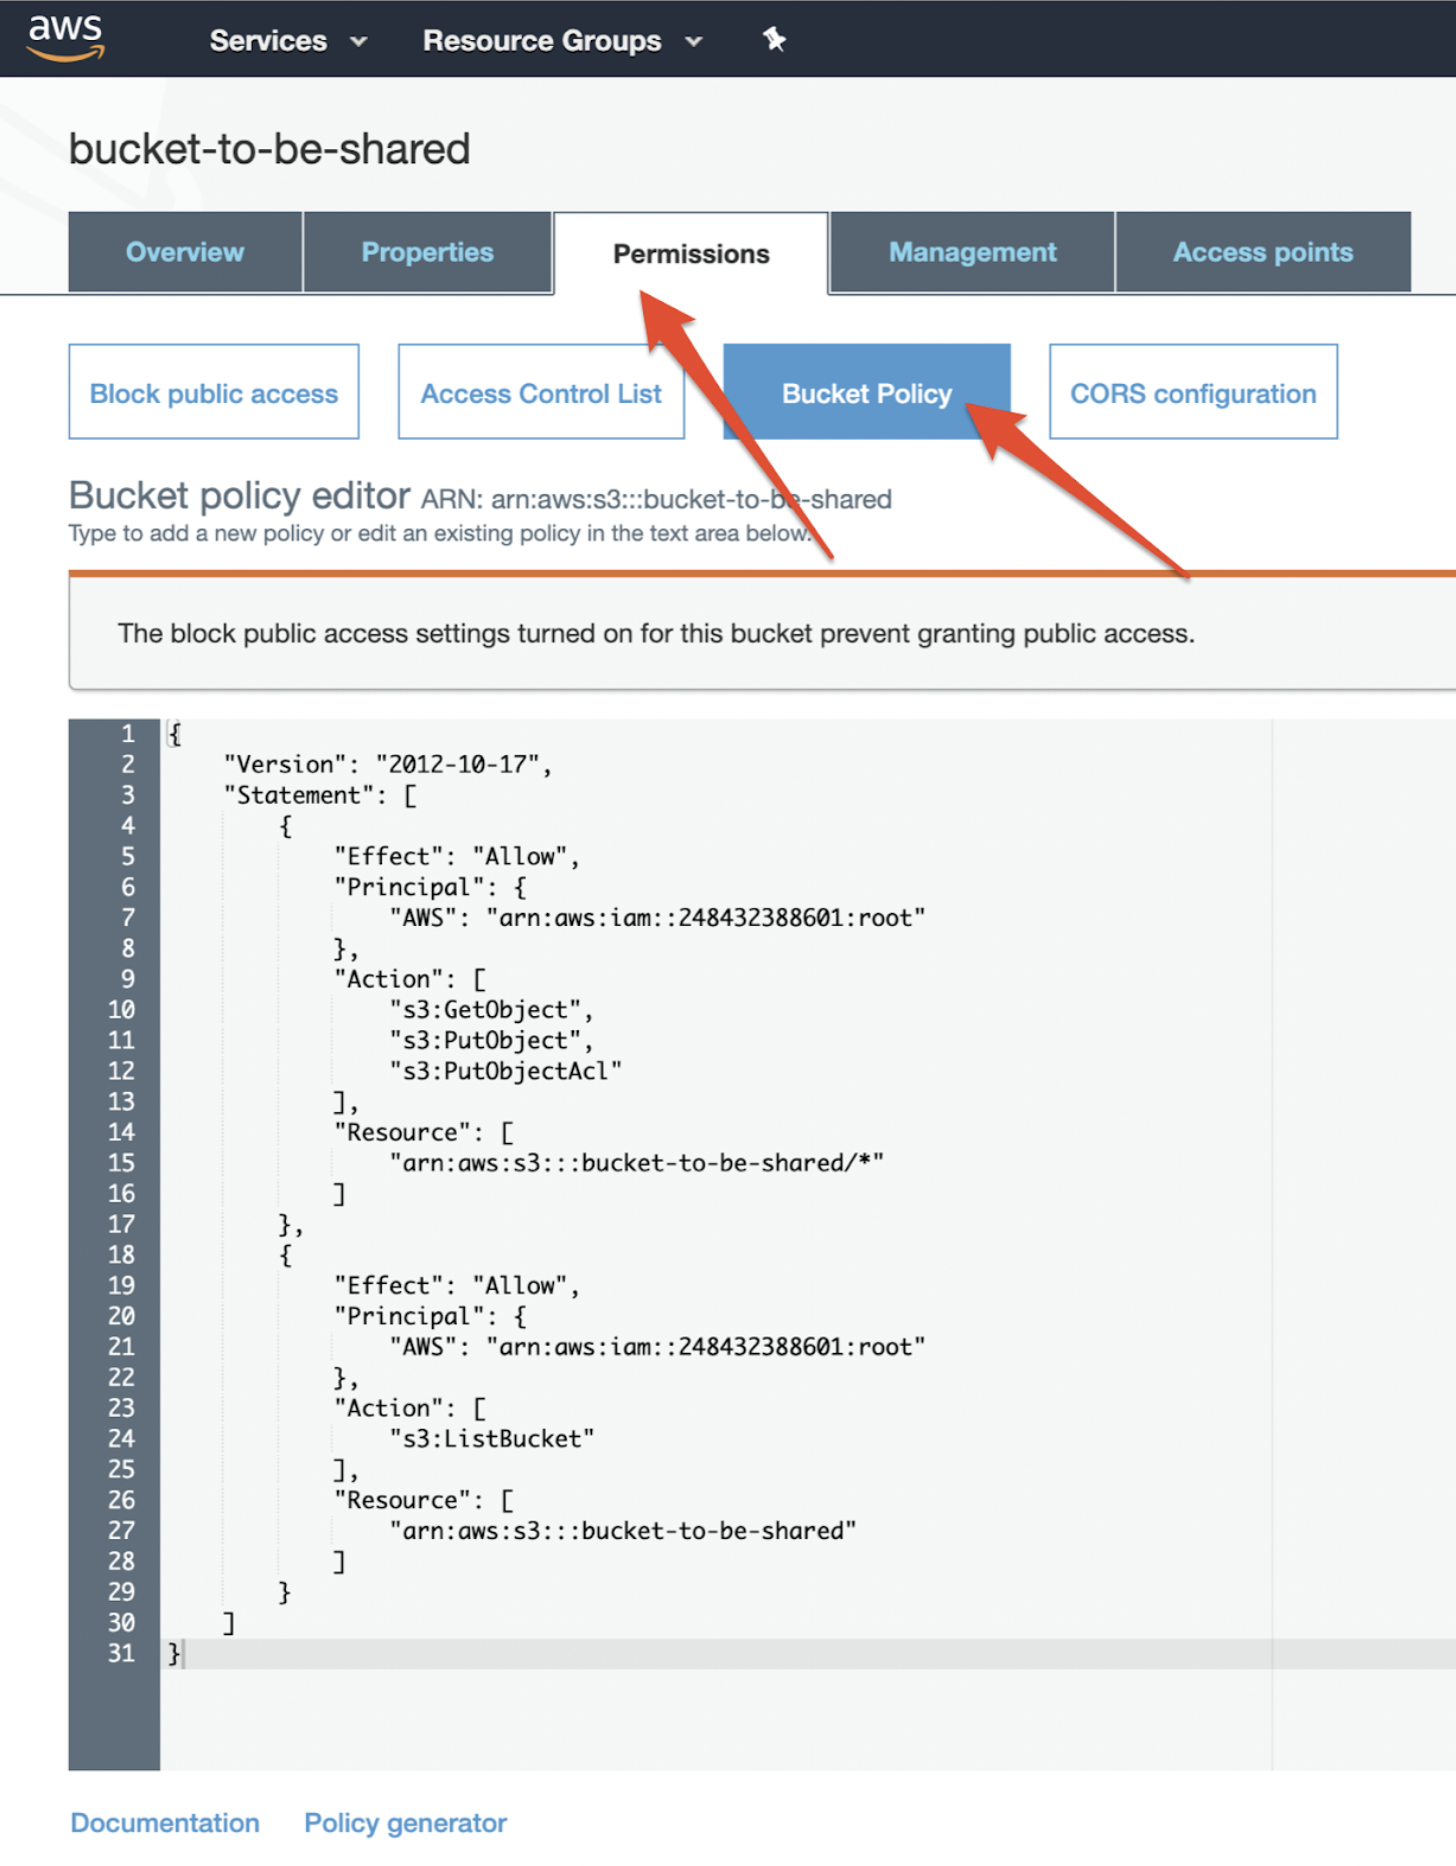
- Select Permissions -> Bucket Policy
- Add the following bucket policy for the access: (Replace rill-${ORG_NAME}-share or bucket-to-be-shared with the bucket name)
{
   "Version": "2012-10-17",
   "Statement": [
       {
           "Effect": "Allow",
           "Principal": {
               "AWS": "arn:aws:iam::248432388601:root"
           },
           "Action": [
               "s3:GetObject",
               "s3:PutObject",
               "s3:PutObjectAcl"
           ],
           "Resource": [
               "arn:aws:s3:::rill-${ORG_NAME}-share/*"
           ]
       },
       {
           "Effect": "Allow",
           "Principal": {
               "AWS": "arn:aws:iam::248432388601:root"
           },
           "Action": [
               "s3:ListBucket",
               "s3:GetBucketLocation"
           ],
           "Resource": [
               "arn:aws:s3:::rill-${ORG_NAME}-share"
           ]
       }
   ]
}

Using CLI
We can use CLI to put the bucket policy too. Make sure you have access to put bucket policy.
export BUCKET="rill-${ORG_NAME}-share" #Create a bucket with Name of Bucket to be shared

curl -s http://pkg.rilldata.com/aws/cross-account-s3-bucket-policy.json | sed "s/bucket-to-be-shared/${BUCKET}/" | tee policy.json

aws s3api put-bucket-policy --bucket ${BUCKET} --policy file://policy.json
Method 2: AWS IAM Roles
We can provide access to the S3 Bucket through an IAM Role which will be assumed by the Rill Data AWS Account to gain the access to the buckets.
Using Cloudformation Console
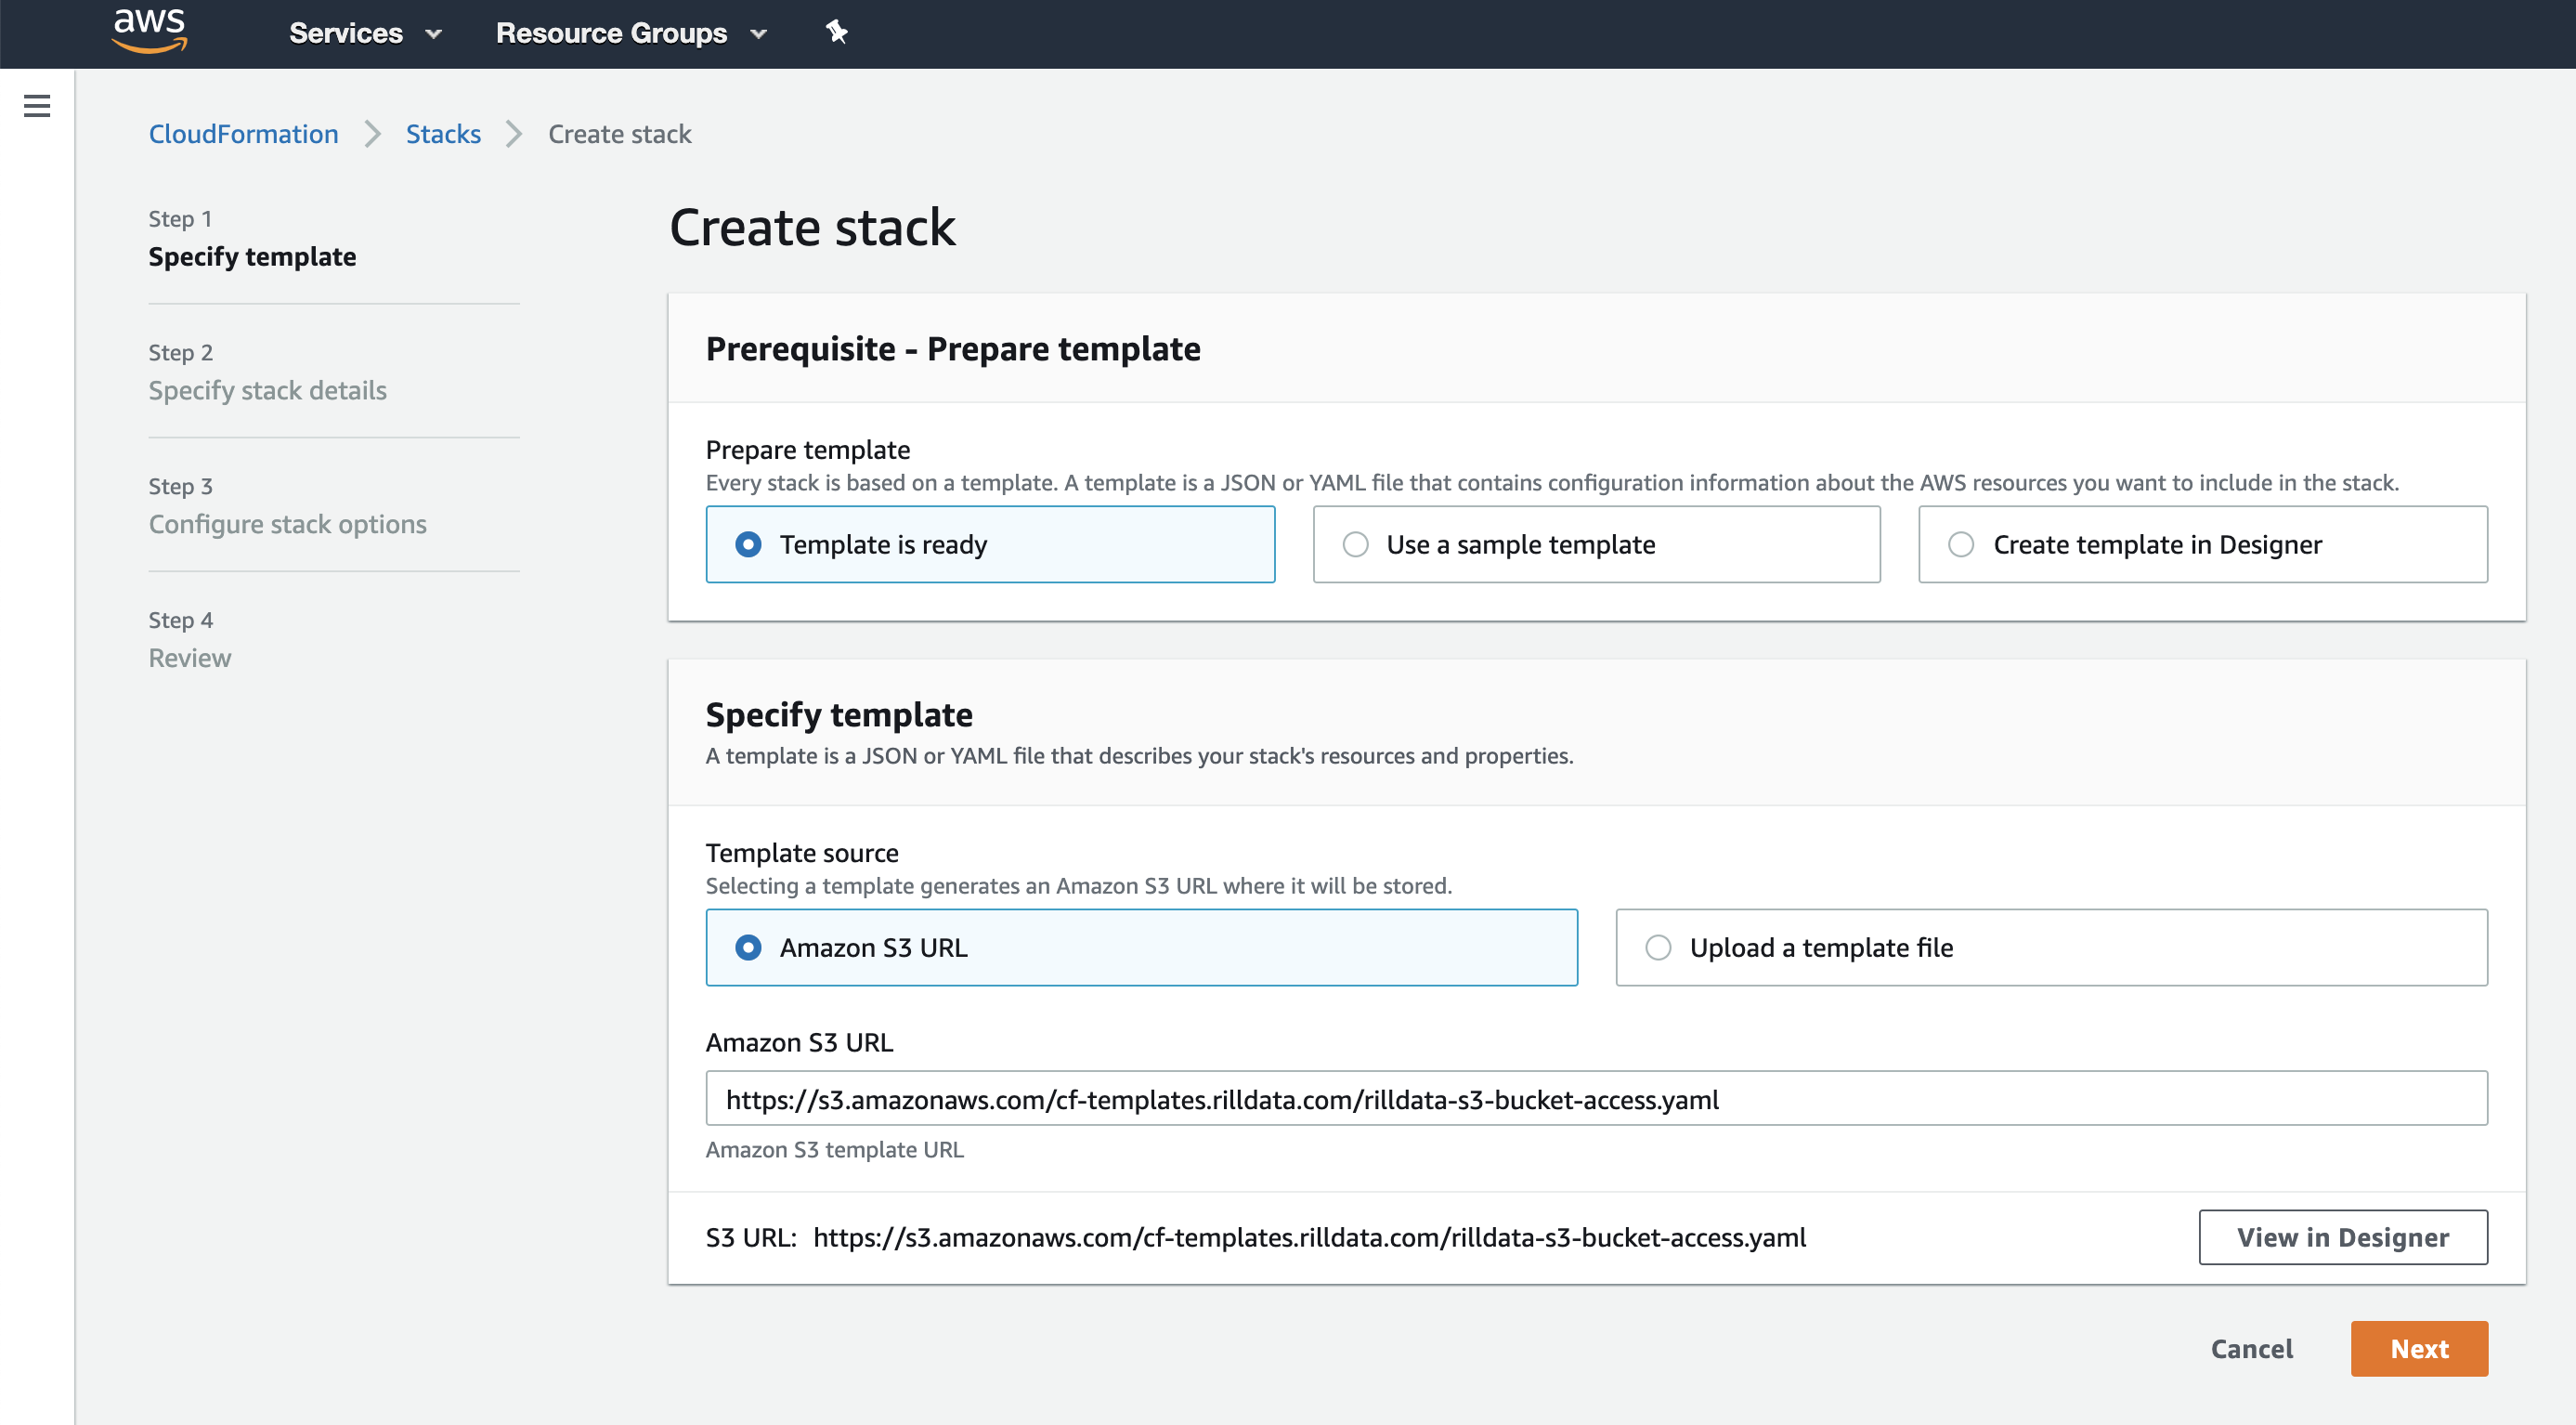
Open AWS Cloudformation to create a new Stack. https://console.aws.amazon.com/cloudformation/home?region=us-east-1#/stacks/create/template
Use Amazon S3 URL:
https://s3.amazonaws.com/cf-templates.rilldata.com/rilldata-s3-bucket-access.yaml
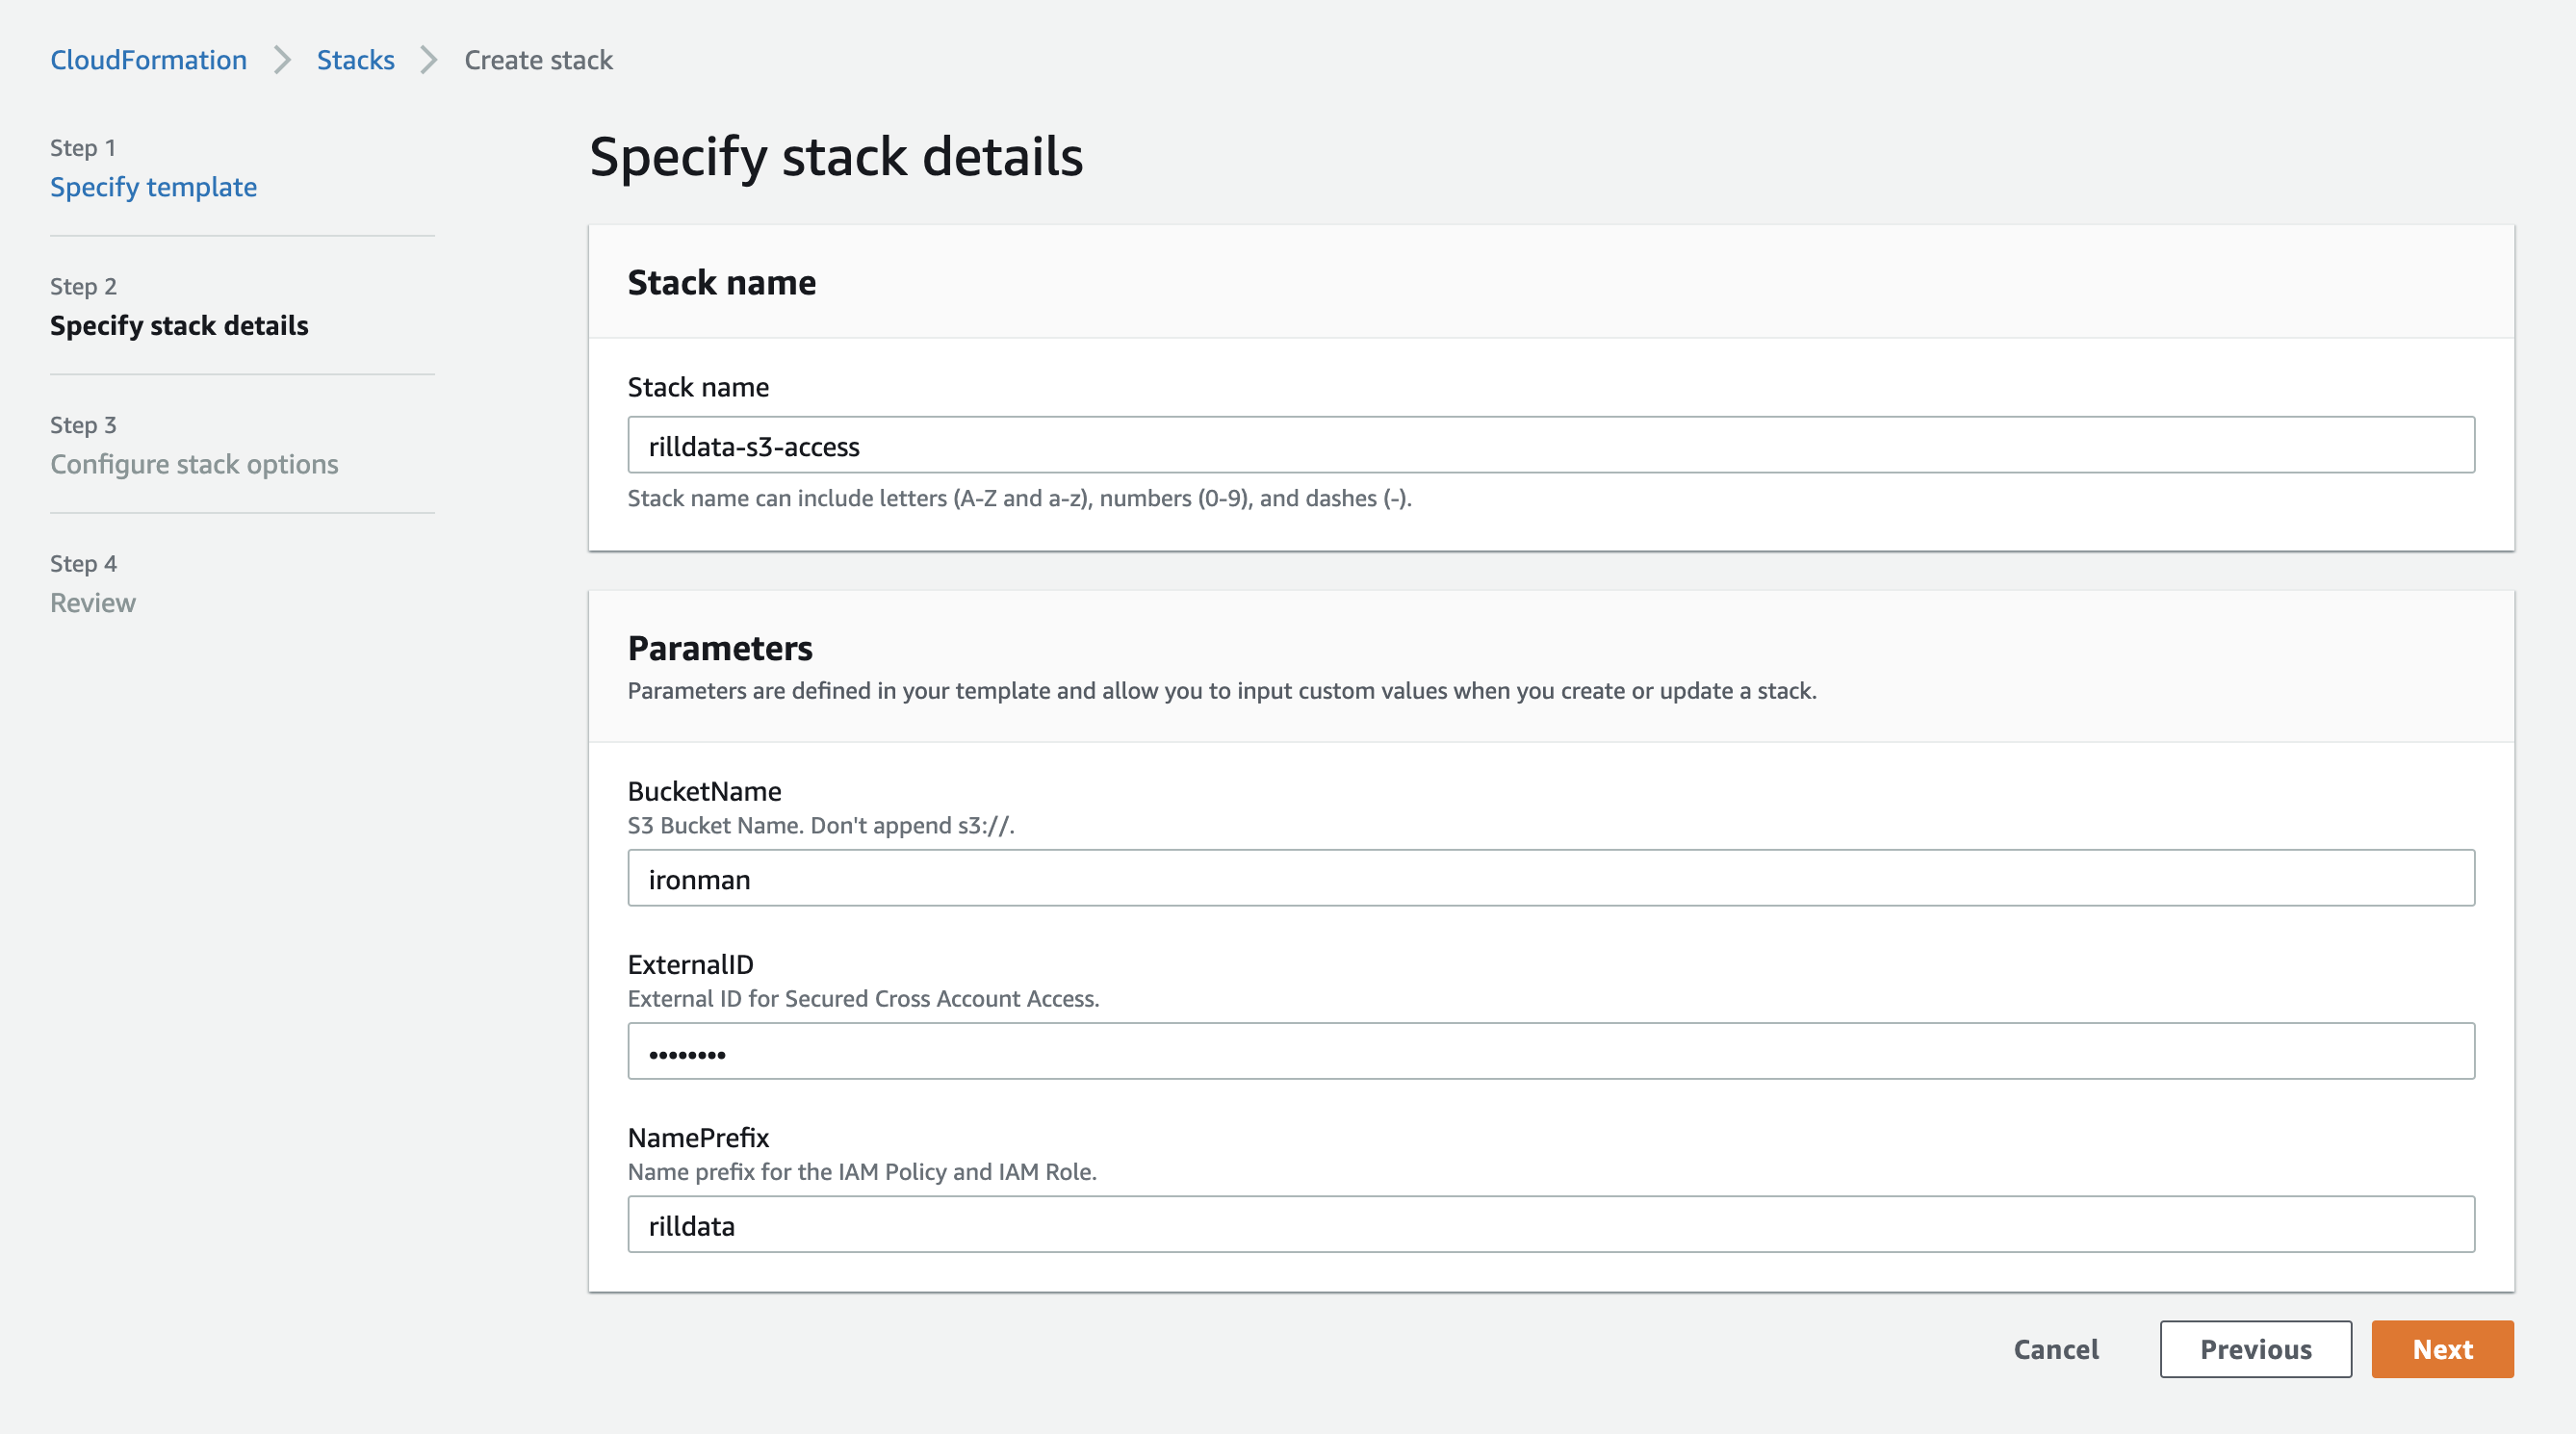
Specify Stack Details Stack Name:
rilldata-s3-accessBucket Name: Name of the bucket we want to provide access to.
Click Next, Again Next, Acknowledge the Capabilities and Create the Stack.
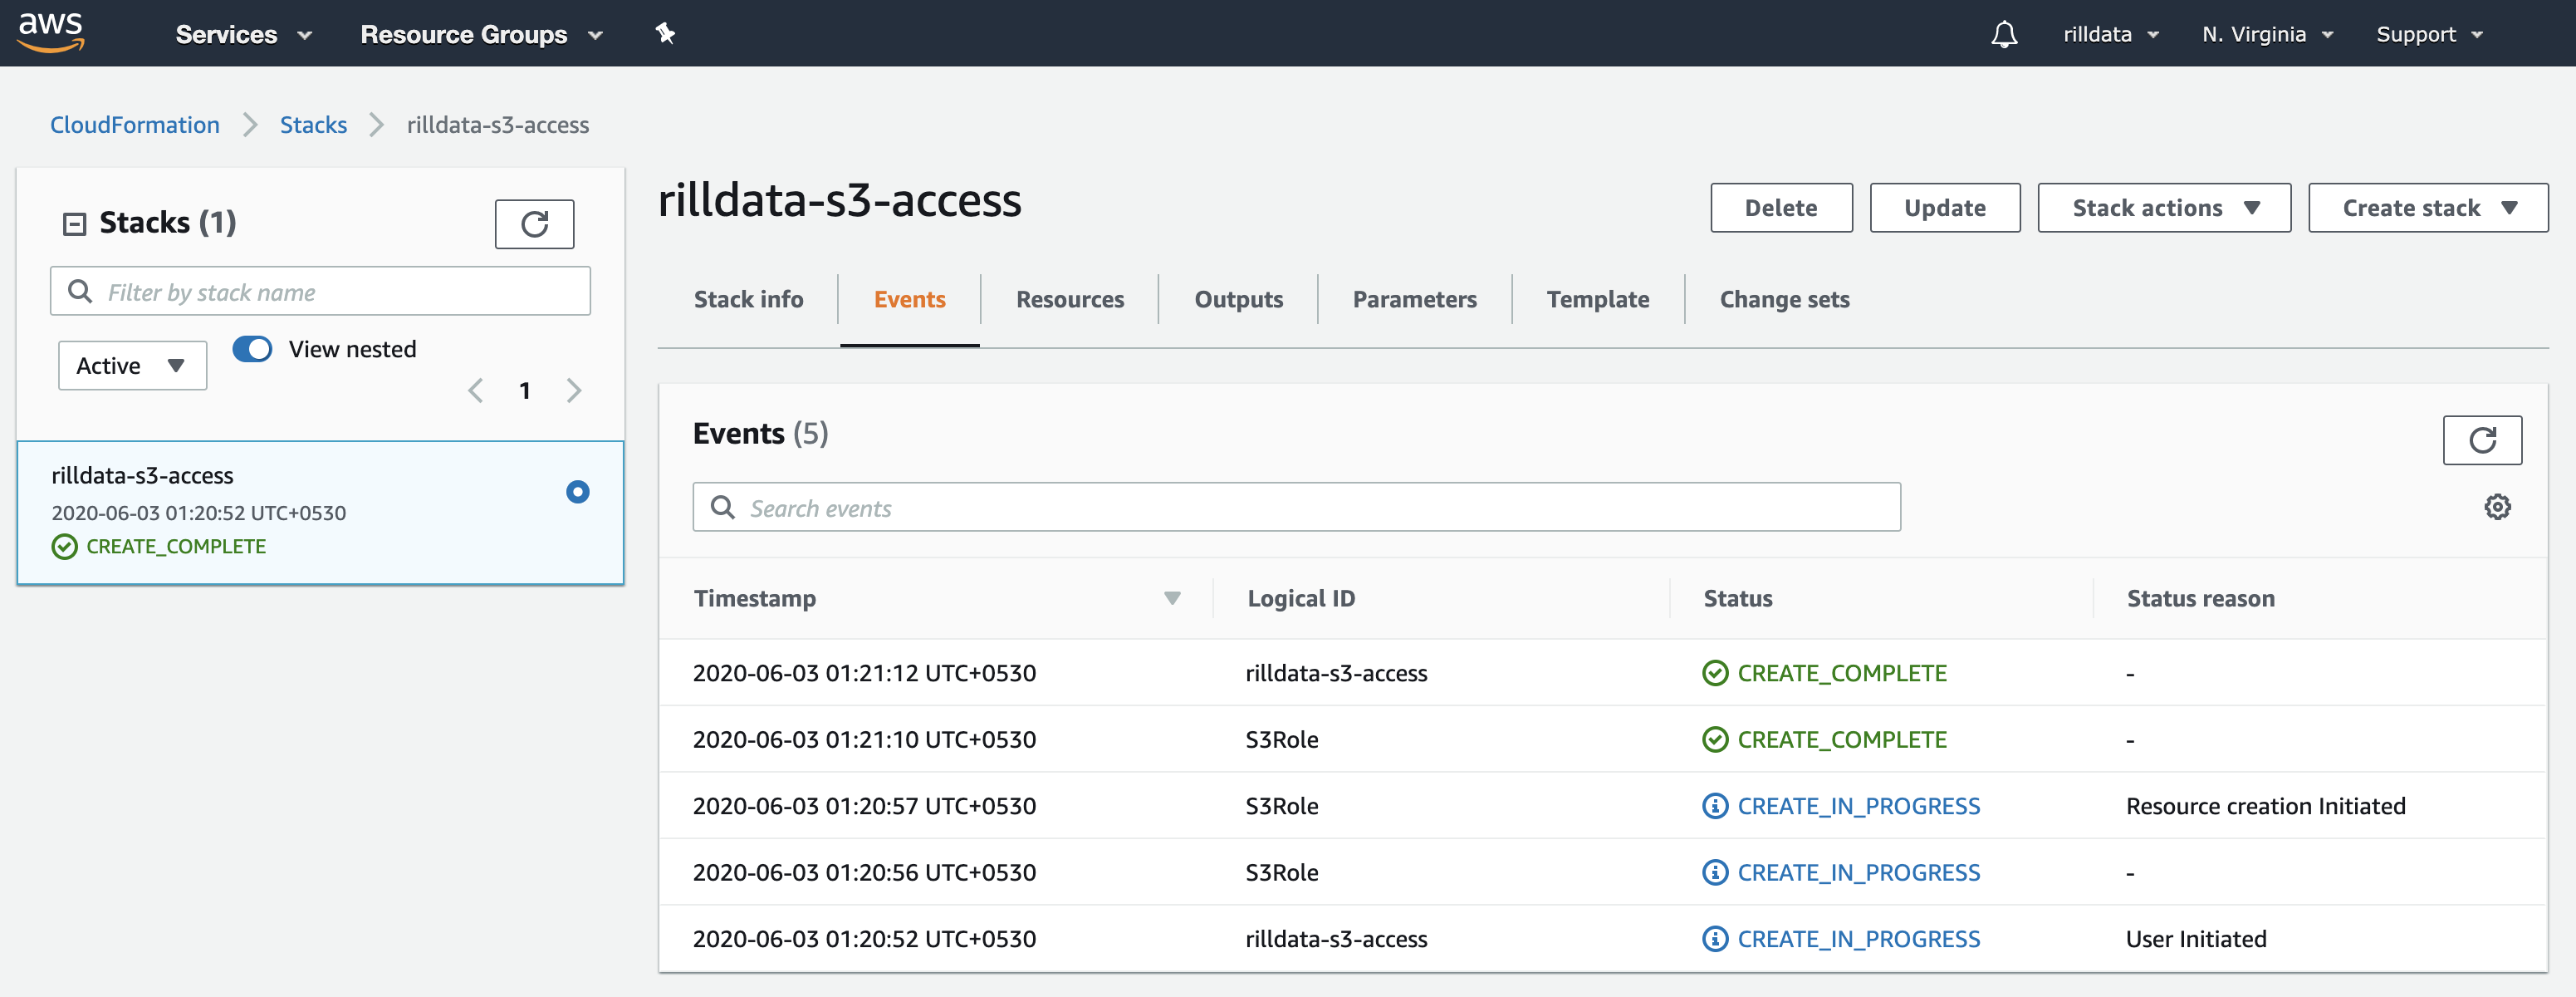
You can check the events and it should create the resources for you.

Share the Outputs with Rill Data

CloudFormation Template Reference
We would be using the following Cloudformation Template.
AWSTemplateFormatVersion: '2010-09-09'
Metadata:
  License: Apache-2.0

Description: 'AWS CloudFormation Template for providing Rill Data Access to S3 Bucket. It creates a
  Role that can be assumed by the RillData AWS Account. The Role has a IAM policy associated with them.'

Parameters:
  BucketName:
    Type: String
    Description: S3 Bucket Name. Don't append s3://.
  NamePrefix:
    Type: String
    Description: Name prefix for the IAM Policy and IAM Role.
    Default: rilldata
  ExternalID:
    Type: String
    Description: External ID for Secured Cross Account Access.
    Default: r!lld@ta

Resources:
  S3Role:
    Type: AWS::IAM::Role
    Properties:
      Description: 'RillData Access to the S3 Bucket. Managed by: Cloudformation'
      AssumeRolePolicyDocument:
        Version: '2012-10-17'
        Statement:
          - Effect: Allow
            Principal:
              AWS:
                - 'arn:aws:iam::248432388601:root'
            Action:
              - 'sts:AssumeRole'
            Condition:
              StringEquals:
                'sts:ExternalId': !Ref ExternalID
      Policies:
        - PolicyName: !Join
            - ''
            - - !Ref NamePrefix
              - 'S3AccessPolicy'
          PolicyDocument:
            Statement:
            - Effect: Allow
              Action: ['s3:*']
              Resource:
                - !Join
                  - ''
                  - - 'arn:aws:s3:::'
                    - !Ref BucketName
                - !Join
                  - ''
                  - - 'arn:aws:s3:::'
                    - !Ref BucketName
                    - '/*'
      RoleName: !Join
        - '-'
        - - !Ref NamePrefix
          - s3-access
      Tags:
        - Key: Accessor
          Value: RillData
        - Key: ManagedBy
          Value: Cloudformation

Outputs:
  RoleName:
    Value: !GetAtt [S3Role, Arn]
    Description: S3 Access Role Arn, to be shared with RillData
  ExternalID:
    Value: !Ref ExternalID
    Description: ExternalID for Secured Access, to be shared with RillData
S3 Logging
As part of your data uploads, Rill Data requires logging to be enabled for the data you intend on sending to us for processing. Rill Data may use these logs for troubleshooting, pipeline optimization, and/or billing. In order to allow Rill Data to access these logs, please follow the instructions below to set up the proper configuration.
If you have not enabled logging for the bucket Rill Data is ingesting data from, please follow these steps:
Go to http://aws.amazon.com
- Login to your AWS account on the AWS Management Console and navigate to the S3 tab
- Click the “Properties” icon on the upper-right menu to bring up the “Properties” options on the bucket Rill Data is ingesting data from
- Under “Logging”, click “Enabled”
- Under “Target Bucket”, select the same name of the bucket Rill Data is processing data from
- Under “Target Prefix”, make sure “s3logs/” is entered
- Click Save
Log into your Amazon S3 console and open AWS Cloudformation to create a new Stack. https://console.aws.amazon.com/cloudformation/home?region=us-east-1#/stacks/create/template Note: the person implementing this configuration must have permission to manage CloudFormation and IAM resources.
Click on "Create Stack" and under "Choose a template", either upload the template provided by Rill Data, or use the following s3URL: https://s3.amazonaws.com//cf-templates.rilldata.com/RillS3LogRole.yaml
The template allows you to set the following parameters:
- "Stack name"
- Name the stack
rill-${ORG_NAME}-s3Logs
- Name the stack
- "S3LogBucketName"
- Description: "New or existing bucket for S3 logs"
- "Stack name"
You will then click that you understand that the template will create IAM resources, and then click "Create".
Once the stack has finished being created, send your Rill Data representative the results on the "Outputs" tab.
- RoleARN: This IAM role identifier allows Rill Data to ingest the S3 Logs
- S3BucketName: This is the name of S3 Bucket that the Rill Data role can have access to, in this case, it should be the bucket name you inputted into Cloudformation
Note: If interested, you can set lifecycle policies on the log bucket of interest. You can either leave this variable blank (no lifecycle policy) or 35 days at minimum. This can be applied through the S3 console on the respective bucket. Reach out to your Technical Account Manager or Sales Director if you have any questions.